Wednesday, January 16, 2013

The Unit Test Maturity Model

In software development (and other paradigms), there is the notion of a "maturity model", where level zero reflects complete ignorance of the metric being measured, followed by multiple levels of increased acknowledgement and performance of the desired metric.

The first of these is clearly the Capability Maturity Model which was applied to software and general business processes way back in the previous century.  An instance that is more relevant to this article would be the Testing Maturity Model, which applies to software testing in general.

It occurs to me that no one has thought of defining a maturity model for unit testing, separate from software testing in general. This article is an attempt to define this scale. I write this from the context of Java development, but these levels will easily apply to other programming languages.

Note that you could also consider other aspects of testing, like acceptance testing, which can be done in an automated fashion. This is very important, but it can and should be addressed separately from unit testing.

Level zero - Ignorance

The zeroth level of this model is represented by organizations that are either completely ignorant of the need for unit testing in their software or that believe that "it won't work here".

I've also seen a pattern at this level where managers refer to "unit testing" as a verb, not as a noun. This means that they have developers build the application and run it on the target platform to make sure that it behaves as they intended. The idea that tests could be run in an isolated fashion and run automatically has never occurred to them.

In my current organization, I'd say we were in this state barely a year ago.

Level 1 - Few Simple Tests

At this level, some people on the team understand the basic idea of a unit test and acknowledge it's probably a good thing, and some simple-minded unit tests are written and stored in source control, and that's all.

These tests are typically only used by the person who wrote the code being tested.  They are not consistently maintained, and they are not run or even compiled as part of the build, so it's impossible to tell what state they will be in at any time.

Level 2 - Mocks and Stubs

After level 1, there are several possible epiphanies people may discover, so the order of these may vary.  One possible discovery at level 2 is using mocks and stubs to isolate physical dependencies to make it possible to write a true unit test.

If the software being tested is structured somewhat reasonably (see other level descriptions), then layers that access physical dependencies would be isolated into separate dependent classes. This makes it easy to use mocking frameworks like Mockito or EasyMock to make it easier to write tests.  Sometimes PowerMock can be used when the code isn't quite as well structured. Javascript has frameworks like MockJax that can perform a similar function.

Level 3 - Design for Testability

This level simply refers to writing code that is easier to test, even if no tests are ever written for it. If this happens naturally before an organization even discovers unit tests, then they probably won't even notice PowerMock (although Mockito is still a no-brainer).

Teams at this level write code that has clear delineations of responsibility (See the Single Responsibility Principle), so it's easy to separate code to be tested from other code that is used to satisfy dependencies.

This is often associated with the use of dependency injection and inversion of control.  You can still get reasonable "design for testability" without either of these, but you'll often end up with lots of static utility classes and complicated constructor calls, which will often require using PowerMock to untangle things.

Level 4 - Test Driven Development

It's hard to say whether this level belongs at this point in the scale, or higher up, or if it's even necessary at all.

The basic idea of test-driven development is that instead of writing unit tests after you write the code, you start out writing the unit test, and evolve both the code being tested and the unit test at the same time. This sounds like a simple idea, but it results in a very different way of thinking about writing code. The key point to understand is that when you write code in a TDD-way, you end up with code that is structured differently from what you would get without TDD. using TDD subsumes the idea of "design for testability". You inherently get code that is testable when you utilize TDD.

Level 5 - Code Coverage

There comes a time in a team's history where a robust set of unit tests are written and maintained, and one day a big error is discovered in production.  A root cause is analyzed and it's found that the error would have been noticed with a simple unit test, but no one realized that the block of code that failed was never executed in any test.

The problem is that no one realized that the existing unit tests weren't testing all of their business logic, or at least not the parts that mattered.  This is what code coverage is for.

When unit tests are run with a code coverage framework in place, it will cause statistics to be automatically generated that measure exactly what lines of code are executed when a unit test is executed. These lines of code can be counted and compared to the total number of lines of code in the project, or interactive views can be generated that list the code in a project in a way to illustrate which code lines have been tested with unit tests, and which lines have not.

For Java, there are a few possible choices for frameworks to support code coverage:
The last one is a commercial product from Atlassian, and the others are free and open-source. There is an older framework called Emma which was the core of the EclEmma Eclipse plugin. Ironically, Emma is now considered obsolete, and even the EclEmma plugin uses JaCoCo under the covers, and is even maintained by the same team that maintains EclEmma.

With one or more of these frameworks in place, there is acknowledgement and understanding of the need to pay attention to what lines of code are being tested by unit tests.

Level 6 - Unit Tests in the Build

This is another step that may or may not have already been implemented, if organizations have achieved the previous levels.

If you're writing unit tests, and you're even determining the level of coverage of those tests, are all of the developers and managers certain that all of these tests are passing?  You can't be certain of this until the unit tests are run every time the source code is built. This requires adding a step to the required build process that compiles and runs the unit tests, and most importantly, requires all the unit tests to pass for the build to be marked as completed. If you don't have this, then management is not fully committed to unit tests.

This level is easy to achieve with Maven. If you have any unit tests at all in a project, Maven notices them, and if any of them fail, the build fails.  This is the default behavior, without adding any configuration at all.  If you're using Ant (what I like to call "build assembly language"), then you have to take manual steps to make this happen (just like anything else you have to do in Ant).

Level 7 - Code Coverage Feedback Loop

At this point, we're likely in a very good state. There's only one missing element related to code coverage, and with that some general code quality issues.

We're generating code coverage statistics, but only the developers writing unit tests are looking at the data, and likely only for the  unit tests that they have individually written. In addition, some projects are doing better than others at extending coverage, and there isn't enough awareness of the projects with deficient coverage.

The problem is that these statistics aren't being published anywhere so it's easy for managers or other developers to see. This is what you get with Sonar. With this in place, not only are code coverage statistics being published for easy viewing, it will present the history of increases or decreases in code coverage for individual or aggregate projects, to a potentially obsessive level of detail.

Sonar also provides other code quality metrics like FindBugs, PMD, and Checkstyle, just to name the more prominent ones.

Level 8 - Automated Builds and Tasks

Now that all of these features are in place, it would be a complete mess if all of these things had to be run manually.

What you want to see happen is that when a developer clicks a button to check in a set of files, an automated process notices a new checkin and starts a set of processes does something like the following:
  • Checks out a fresh copy of the source tree
  • Compiles the source code
  • Runs the unit tests, generating code coverage statistics
  • Runs a Sonar scan
  • Assembles deployable artifacts
  • Deploys artifacts to acceptance test servers
  • Runs automated acceptance tests
  • Publishes results from all automated deployment and test steps
This is what a continuous integration server is for.  There are several good choices for this, including Jenkins, Hudson, and Bamboo. With any of these in place,  setting up and maintaining all of these automated tasks is very straightforward.
Monday, September 24, 2012

Better to call getters internally instead of direct instance variable references

I often see people using a coding standard that specifies to put some sort of hungarian-like prefix on instance variables, so if you write code that directly references instance variables, you can distinguish those references from local variables. I think that coding standards are generally a good thing, but I've never liked any variant of hungarian notation, as I think it's more important to focus on the interpretation of variables in a domain, not necessarily their implementation. That leads me to define variables that clearly reflect what they represent, in a readable fashion.

Although I've always felt this way, I've hesitated to argue strongly for this because I expected people would argue that calling getters would be slower than direct references, and I'd always thought they would likely be right. There used to be talk about the Java compiler "inlining" methods if they were marked as final, but I've since realized that all of these are misconceptions.

If we're talking about pure Java bytecode running in a VM, then getters will definitely be slower. However, the reality is that any bytecode that gets run a significant number of times in a JVM will get processed by the Hotspot compiler in a completely reasonable fashion.

For instance, don't you think it would be reasonable for the JVM to inline getter code, whether it's marked "final" or not?  In fact, that's exactly what the Hotspot compiler does, after it's executed a getter just a few times.

As a result, if you believe as I do that code is more understandable if instance variables are always accessed through getters, then you don't have to worry about this being slower than direct references, because the resulting code at runtime is virtually identical.

How about if I prove it to you?

Let's first start with a couple of trivial foundation classes that I use in a variety of timing tests.
package timings;

public class TimingContainer {
    private int         iterations;
    private String      label;
    private TimingTest  timingTest;

    public TimingContainer(int iterations, String label, TimingTest timingTest) {
        this.iterations = iterations;
        this.label      = label;
        this.timingTest = timingTest;
    }

    public void run() {
        long    totalns = 0;
        for (int ctr = 0; ctr < iterations; ++ ctr) {
            long startTime  = System.nanoTime();
            timingTest.run();
            totalns += (System.nanoTime() - startTime);
        }
        System.out.println(label + ":" + (totalns / iterations));
    }
}
Notice that I use nanoseconds, as opposed to milliseconds. The last I heard, the millisecond timer was unreliable on Windows, and nanoseconds are better for measuring smaller code blocks.


package timings;

public interface TimingTest {
    public abstract void run();
}
The "TimingTest" interface is pretty simple. You could just as easily use "Runnable", but I like defining an interface to reflect this. The name could be better.

Here's my timing test class specifically for testing getter vs. direct timings.
package timings;

public class GetterSetterTimings {

    public static void main(String[] args) {
        GetterSetterTimings timings = new GetterSetterTimings(args);
        timings.go();
    }
    
    public GetterSetterTimings(String[] args) { }
    
    private void go() {
        final IntContainer    intContainer    = new IntContainer();
        intContainer.int1(9).int2(33).int3(35).int4(11).int5(99).int6(104).int7(4064).int8(22).int9(44);

        final StringContainer   stringContainer = new StringContainer();
        stringContainer.string1("abc").string2("xxxxxxxxxxxxxx").string3("z").string4("asdf").string5("33333333333333333").
            string6("ljsdflkjsflksdfj").string7("fffffffffffffffff").string8("b").string9("vvvvvvvvvvvvvvvvvv");
        
        for (int ctr = 0; ctr < 10; ++ ctr) {
            testWithGS(intContainer);
            testWithVars(intContainer);
            testWithGS(stringContainer);
            testWithVars(stringContainer);
        }
        
        int     iters   = 100000000;

        new TimingContainer(iters, "intgetterssetters", new TimingTest() {
            public void run() {
                testWithGS(intContainer);
            }
        }).run();
        
        new TimingContainer(iters, "intvars", new TimingTest() {
            public void run() {
                testWithVars(intContainer);
            }
        }).run();

        new TimingContainer(iters, "strgetterssetters", new TimingTest() {
            public void run() {
                testWithGS(stringContainer);
            }
        }).run();
        
        new TimingContainer(iters, "strvars", new TimingTest() {
            public void run() {
                testWithVars(stringContainer);
            }
        }).run();

    }
    
    public int testWithGS(IntContainer intContainer) {
        return intContainer.computeValueWithGS();
    }
    
    public int testWithVars(IntContainer intContainer) {
        return intContainer.computeValueWithVars();
    }

    public String testWithGS(StringContainer stringContainer) {
        return stringContainer.computeValueWithGS();
    }
    
    public String testWithVars(StringContainer stringContainer) {
        return stringContainer.computeValueWithVars();
    }

    public static class IntContainer {
        private int int1;
        private int int2;
        private int int3;
        private int int4;
        private int int5;
        private int int6;
        private int int7;
        private int int8;
        private int int9;
        
        public int getInt1() { return int1; }
        public int getInt2() { return int2; }
        public int getInt3() { return int3; }
        public int getInt4() { return int4; }
        public int getInt5() { return int5; }
        public int getInt6() { return int6; }
        public int getInt7() { return int7; }
        public int getInt8() { return int8; }
        public int getInt9() { return int9; }
        
        public void setInt1(int int1) { this.int1 = int1; }
        public void setInt2(int int2) { this.int2 = int2; }
        public void setInt3(int int3) { this.int3 = int3; }
        public void setInt4(int int4) { this.int4 = int4; }
        public void setInt5(int int5) { this.int5 = int5; }
        public void setInt6(int int6) { this.int6 = int6; }
        public void setInt7(int int7) { this.int7 = int7; }
        public void setInt8(int int8) { this.int8 = int8; }
        public void setInt9(int int9) { this.int9 = int9; }

        public IntContainer int1(int int1) { this.int1 = int1; return this; }
        public IntContainer int2(int int2) { this.int2 = int2; return this; }
        public IntContainer int3(int int3) { this.int3 = int3; return this; }
        public IntContainer int4(int int4) { this.int4 = int4; return this; }
        public IntContainer int5(int int5) { this.int5 = int5; return this; }
        public IntContainer int6(int int6) { this.int6 = int6; return this; }
        public IntContainer int7(int int7) { this.int7 = int7; return this; }
        public IntContainer int8(int int8) { this.int8 = int8; return this; }
        public IntContainer int9(int int9) { this.int9 = int9; return this; }

        public int computeValueWithGS() {
            return getInt1() + getInt2() + getInt3() + getInt4() + getInt5() + getInt6() + getInt7() + getInt8() + getInt9();
        }
        
        public int computeValueWithVars() {
            return int1 + int2 + int3 + int4 + int5 + int6 + int7 + int8 + int9;
        }
    }
    
    public static class StringContainer {
        private String string1;
        private String string2;
        private String string3;
        private String string4;
        private String string5;
        private String string6;
        private String string7;
        private String string8;
        private String string9;
        
        public String getString1() { return string1; }
        public String getString2() { return string2; }
        public String getString3() { return string3; }
        public String getString4() { return string4; }
        public String getString5() { return string5; }
        public String getString6() { return string6; }
        public String getString7() { return string7; }
        public String getString8() { return string8; }
        public String getString9() { return string9; }
        
        public void setString1(String string1) { this.string1 = string1; }
        public void setString2(String string2) { this.string2 = string2; }
        public void setString3(String string3) { this.string3 = string3; }
        public void setString4(String string4) { this.string4 = string4; }
        public void setString5(String string5) { this.string5 = string5; }
        public void setString6(String string6) { this.string6 = string6; }
        public void setString7(String string7) { this.string7 = string7; }
        public void setString8(String string8) { this.string8 = string8; }
        public void setString9(String string9) { this.string9 = string9; }

        public StringContainer string1(String string1) { this.string1 = string1; return this; }
        public StringContainer string2(String string2) { this.string2 = string2; return this; }
        public StringContainer string3(String string3) { this.string3 = string3; return this; }
        public StringContainer string4(String string4) { this.string4 = string4; return this; }
        public StringContainer string5(String string5) { this.string5 = string5; return this; }
        public StringContainer string6(String string6) { this.string6 = string6; return this; }
        public StringContainer string7(String string7) { this.string7 = string7; return this; }
        public StringContainer string8(String string8) { this.string8 = string8; return this; }
        public StringContainer string9(String string9) { this.string9 = string9; return this; }

        public String computeValueWithGS() {
            return getString1() + getString2() + getString3() + getString4() + getString5() + getString6() + getString7() + getString8() + getString9();
        }
        
        public String computeValueWithVars() {
            return string1 + string2 + string3 + string4 + string5 + string6 + string7 + string8 + string9;
        }
    }
}
 Now that we have all of this code, what do we get when we run it normally?  I add "-server" to the command line to make it more similar to how it would be running in reality. I'm running this on a Dell Latitude laptop, with Windows Seven 32-bit.
intgetterssetters:32
intvars:32
strgetterssetters:272
strvars:293
 As you can see, the timing of the integer tests came out identical, even with 100,000,000 iterations. Ironically, the string test with direct references even came out slower than the getter test. I don't consider that significant, however.

Remember that this is happening because of the Hotspot compiler. Would it be helpful if you could run these tests with the Hotspot compiler disabled, or at least convince it to not process the two key methods, being "computeValueWithGS()" and "computeValueWithVars()"?  That is easily done by putting a file called ".hotspot_compiler" in your working directory, with the following contents:
exclude timings/GetterSetterTimings$IntContainer    computeValueWithGS
exclude timings/GetterSetterTimings$IntContainer    computeValueWithVars
exclude timings/GetterSetterTimings$StringContainer    computeValueWithGS
exclude timings/GetterSetterTimings$StringContainer    computeValueWithVars
You also have to add "-XX:CompileCommandFile=.hotspot_compiler" to the JVM command line. With this in place, the results are perhaps more consistent with what you might expect if we didn't have Hotspot around.
CompilerOracle: exclude timings/GetterSetterTimings$IntContainer.computeValueWithGS
CompilerOracle: exclude timings/GetterSetterTimings$IntContainer.computeValueWithVars
CompilerOracle: exclude timings/GetterSetterTimings$StringContainer.computeValueWithGS
CompilerOracle: exclude timings/GetterSetterTimings$StringContainer.computeValueWithVars
### Excluding compile: timings.GetterSetterTimings$IntContainer::computeValueWithGS
intgetterssetters:288
### Excluding compile: timings.GetterSetterTimings$IntContainer::computeValueWithVars
intvars:87
### Excluding compile: timings.GetterSetterTimings$StringContainer::computeValueWithGS
strgetterssetters:771
### Excluding compile: timings.GetterSetterTimings$StringContainer::computeValueWithVars
strvars:533
This definitely illustrates how much value the Hotspot compiler provides.

In conclusion, I think it should be obvious that you don't have to be concerned about the overhead of calling getter methods, as it clearly goes away in reality.

Saturday, October 9, 2010

Keyboard Nirvana with Eclipse and Emacs+

Introduction


Before I say anything else, let me make one thing perfectly clear: You do not need to know anything about Emacs to get maximum value from the Emacs+ plugin. You don’t have to be an Emacs user and you don’t have to know anything about Lisp. The Emacs+ plugin simply provides numerous functions that are very similar to their Emacs origins and that are very applicable to the Eclipse environment. To use them, you just execute the functions. Hopefully this will alleviate your fear that you’ll have to be an Emacs expert to make use of this.

Now that that’s out of the way, some other issues we need to talk about are how to make your keyboard usage in Eclipse more efficient, whether you use Emacs+ or not.

One of those first steps is understanding and accepting that Eclipse lets you bind arbitrary key sequences to Eclipse functions. You’ll want to determine for yourself what are convenient key bindings, and which functions you want to be easier to get to, compared to others. I’ll go over this in more detail.

If you accept that, you’ll probably come to the conclusion that you’ll be using the Control key a lot. An advanced corollary of that is that it’s perfectly reasonable to rearrange your keyboard keys so that it’s more convenient. I’m not suggesting that you use a Dvorak layout (if you do, you probably already have maximally optimized your environment), but there is a single simple change that will make your keyboard usage more convenient: getting rid of the useless CapsLock key and making it an additional Control key. I’ll talk more about this and cover a tool or two that helps with this.

Once we have these foundational elements in place, we can talk about the Emacs+ Eclipse plugin, and then I’ll talk about a recent set of features in Emacs+ that allow you to record key sequences and store them as keyboard macros that you can then also bind to keys. I’ll close with an example of a keyboard macro that you might find useful.

Binding key sequences to functions


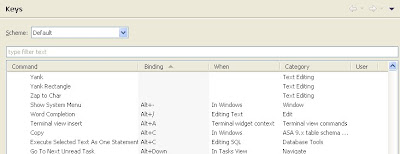
If you go to the “General”->“Keys” section of the Eclipse preferences, you’ll see the page where you can view and change key bindings. If you click on the “Binding” header and then scroll (way) down to the first command that has a non-empty binding, you’ll initially see commands that have “simple” bindings, like the first one that I see, which is “Alt+-” (alt-dash), which in my Eclipse is bound to “Show System Menu”.

If you scroll further down, you might see the various “Debug” commands, like “Debug Java Application”, which is bound to “Alt+Shift+D, J”. This is essentially a two character sequence. The first character is “Alt+Shift+D” (pressing “d” while holding down “Alt” and “Shift”) and the second character is just “j”. There are several other multiple character bindings that begin with “Alt+Shift+D”. This works because there is no binding for the single character “Alt+Shift+D”. A character (or sequence of characters) that is used to begin a binding cannot itself be bound to a command.

The other benefit of sorting this list by “Binding” is that you can see some “gaps” that show some character sequences that are not bound to commands. For instance, starting near the top of the non-empty bindings, I see that “Alt+A” is bound to “Terminal view insert” and “Alt+C” is bound to “Copy”, but there is no binding for “Alt+B”. That means you could bind a command to “Alt+B” without disturbing any other bindings.

Also note the "When" column. This specifies the editor or context that the binding is applicable to. For instance, I mentioned that I have "Alt+C" bound to "Copy", but I also have the same key bound to "Execute Selected Text As One Statement". The difference is that the former's "When" value is "In Windows", and the latter's is "Editing SQL". So if you're in the SQL editor view, then Alt+C does one thing, but it executes "Copy" anywhere else. If you define new bindings here, you'll probably want to set "When" to "In Windows", but you might find special cases where you'll want a different value here.

You’ll want to spend a lot of time browsing through this list, sorting by “Binding” to find prefix keys and sequences that you think will be convenient for your custom bindings. My favorite key that begins several of my custom bindings is “Ctrl+;” (Control-semicolon). I don’t bind a command to that key, I use it as the first character in several two and three character sequences.

Once you start binding commands that begin with a particular character, there is another convenient feature you can use that will remind you of the bindings you have that begin with that key. If you exit the Preferences dialog and then just press that key and wait a moment, you’ll see a popup dialog that shows the bindings that begin with that key. For instance, if you press “Alt+Shift+D” and wait a moment, you’ll see the popup that shows the binding for “Debug Java Application” and other related commands.

Ctrl2Cap


Before I get into Emacs+, let’s first fix your keyboard to make extended use of the Control key more efficient and less painful.

Let me illustrate the issue with a picture:


If you have to press the Control key a zillion times a day, and this is your keyboard, how long will it take before your pinky falls off?
Here’s a related question: How many times have you actually USED the CapsLock key? Have you ever used it? Would you miss it if you didn’t have it anymore? If you never use it, why do you let it take up space on your keyboard? Get rid of it!

On my Ubuntu box, this ability is built into the interface, as I can change the “Ctrl key position” setting in my Preferences to “Make CapsLock an additional Ctrl”. There, it’s done. No more CapsLock key.

It's also very easy to do this on the Mac, just by adjusting the Modifier Keys in the Keyboard section of System Preferences.

On Windows it’s a tiny bit more difficult to do this. It’s not built into the default interface. Fortunately, there is a web site called SysInternals (founded by Mark Russinovich and others) that provides a free tool that makes this easy to do. The utility is called Ctrl2Cap. It’s a very small utility. You download it and install it and restart, and now your CapsLock key is a Control key.

By the way, there are numerous other Windows-based utilities and tools on the SysInternals site that you would probably find useful. I spend time exploring there from time to time. I use several of their tools every day.

Emacs+


We now understand how to make our keyboard usage in Eclipse more efficient by binding key sequences to functions, and making those key sequences easier to type. Now let’s learn about the Emacs+ plugin, that provides many functions that you’ll want to bind to keys.

The Emacs+ Eclipse plugin, written by Mark Feber, is one of the more popular plugins available on the Eclipse Marketplace.

Here’s a short summary of Emacs+ taken from the first page of the Emacs+ documentation:

“Emacs+ is designed to provide a more Emacs-like experience in the Eclipse text editors. Included are enhancements for keyboard driven command execution and keyboard macros, Ctrl-u, keyboard text selection, Emacs style search and query/replace, a kill ring for deleted text, balanced expressions (s-expressions), keyboard driven editor window splitting, transpositions, case conversion commands and append line-comments in the Java editor. In cases where the normal Emacs binding interferes with an Eclipse binding, the Emacs binding is preferred. “

Note that the plugin is really in multiple parts. There is a “core” plugin, and then there is the “optional bindings” plugin. The latter is only useful if you set the "Scheme" setting in your "Keys" preferences to "Emacs+ Scheme" (referred to as "the Emacs binding"). You can install just the “core” plugin and not install the “optional bindings” plugin if you don't use the "Emacs+ Scheme".

Also, if you're on the Mac, there is an additional plugin(s) that deals with the COMMAND key, if you're using the Emacs binding scheme.

Just so it's clear, if you don't use the "Emacs+ scheme", you only need the "core" plugin.

It’s helpful to read through the entire set of Emacs+ documentation to get a feel for what features it provides, and how to use them.

One tidbit that I’ll mention: The “query-replace-regexp” Emacs+ function does something that the normal query/replace functionality in Eclipse doesn’t provide, which I’ll call “intelligent case replacement”.

This function takes two regular expressions, for the “source” string and “replacement” string. This is normal so far. What’s different is that it will look at the actual pattern of characters in a particular occurrence of the “source” string and match the case of that occurrence into the replacement string.

What does that mean? Let’s say that you ask to replace “foo” with “doSomething”. You start with a block like this:
getfoo
getFoo
FOO

When this replacement completes, you’ll have this:
getdoSomething
getDoSomething
DOSOMETHING

Is that something that would be useful to you?

Emacs bindings or Eclipse bindings?


Richard Stallman at laptop
I’ve personally been using various versions of Emacs for about 25 years (not quite as long as him). I’ve been using Eclipse for about 5 of those years. When I’m using Emacs, I have a very effective set of bindings that I use to do the things I need to do. When I first installed the Emacs+ plugin, it was very easy for me to decide whether to install the “bindings” plugin. In fact, I did not. I prefer to work with the already defined conventions for Eclipse key bindings, and then add my own bindings that don’t conflict with those bindings. I urge you to make your own conscious decision about this. If you decide to use your own bindings, keep that in mind while reading the Emacs+ documentation. Much of it refers to the default Emacs+ key bindings, which may differ from what you end up using.

Keyboard Macros


Although I use many functions from Emacs+, one set of functionality that really provides a lot of promise is “keyboard macros”. In short, this gives me the ability to go into a mode where it starts to record keypresses (just keys, not mouse movement), press some keys, then “stop” recording. At that point, I have a keyboard macro that I can reexecute. More importantly, I can also give that macro a name, just like any other command name, and then I can bind a key sequence to that named macro. Even better, I can also save that macro to a file, and I can tell Eclipse to load that saved macro (or all of my saved macros) at startup.

Setting up goto-next-search-occurrence


Now that we have all of these features in place, let’s go over an example of a useful keyboard macro, and how to define it and use it.

I’m sure you use the “Search” view a great deal. You’re in the editor view and you either run a specific hand-entered search, or you search for references to the current function, or other possibilities. As soon as you run the search, the focus moves from the Editor view to the Search view. At this point, you could press “Ctrl+.” (control-period) to move to the first occurrence. When you do that, it changes the Editor view, but your focus is still in the Search view. If you have to get back to the Editor view at this point, you either use the mouse or you press the “f12” key, which is typically bound to “activate-editor”, which moves the focus to the Editor view.

Now what do you do if you want to go to the next search occurrence? You have to go BACK to the Search view and press “Ctrl+.” again. This will go on and on.

Wouldn’t it be better if you could press a key that would go to the next search occurrence, but leave you in the Editor view? Let’s see how we would do this.

Before you define a keyboard macro for a sequence of operations, you need to make sure that you can actually execute all the operations in the sequence with just keypresses. Anything that requires a mouse operation can’t be recorded.

In this case, there are really three operations. The first is putting the focus in the search view. The second is going to the next search occurrence. The third is putting the focus in the editor view. I already described the last two steps (“Ctrl+.” and “f12”). The first step is provided by the “Show View (View: Search)” command, which you can see in the “Keys” list in Preferences. In my environment, I’ve bound this command to “Ctrl+;, Ctrl+S”. This is “Control-semicolon” followed by “Control-s”. I can verify I can execute the entire sequence just by pressing these keys in order (“Ctrl+;, Ctrl+S”, then “Ctrl+.”, then “f12”).

Now let’s record the keyboard macro. In my environment, I bound “kbd-macro-start” and “kbd-macro-end” to “Ctrl+[“ and “Ctrl+]” respectively. I thought those bindings were appropriate. So, while in the editor view I press “Ctrl+[“. It says “Start Kbd Macro” in the status line. I then press the key sequence I described in the previous paragraph. I then press “Ctrl+]” and it says “Kbd Macro defined” in the status line.

Now I have a macro, but it doesn’t have a name. Let’s give it a name with the “name-last-kbd-macro” command. This is one command that I haven’t bound to any key at all. I don’t use it enough for that to be worthwhile for me. Fortunately, Emacs+ provides a way to directly execute commands without key bindings. This is done with the “execute-extended-command” command, which I have bound to “Alt+x” (just about the only command I’ve bound that has the same binding in Emacs+ as in my Emacs environment). Obviously, this is one command that you definitely have to have bound to a key if you want to execute it. After pressing “Alt+x”, I enter “name-last-kbd-macro” (actually, I just enter “nam” and press TAB, which completes it to “name-last-kbd-macro”, using another feature from Emacs, command completion).


I press Enter and it asks me “Name for last kbd macro:”. I enter “goto-next-search-occurrence”. At this point, you could manually execute “goto-next-search-occurrence” by entering it at the “Alt+X” prompt.

Now is a time that you could bind this new command to a key or key sequence. I would have liked to find a somewhat mnemonic key sequence for this, but I ended up with just “Ctr+;, A”.

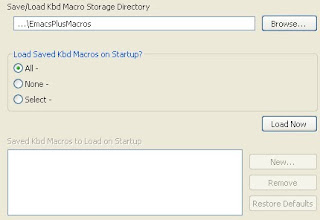
Now I have a macro with a name, but it isn’t saved. In order to save macros, you should first go to the “Kbd Macros” section of the Emacs+ preferences page. You should set up a directory somewhere with a reasonable name. I created a “EmacsPlusMacros” directory off of my home directory. Enter the path to that directory in the “Save/Load Kbd Macro Storage Directory” field. Set the “All” checkbox in the “Load Saved Kbd Macros on Startup?” section. Save these settings.

Now we can save the macro. Press “Alt+x” and enter “save-k” and press TAB to complete to “save-kbd-macro”. Press Enter and it will ask “Save Kbd Macro”. Enter “goto” and press TAB to complete to “goto-next-search-occurrence” (assuming you don’t have any other commands that begin with “goto”).

Now everything is set up. Exit Eclipse and restart it. From the editor view, run a search for something. Press “Ctrl+;, A” (or whatever you bound “goto-next-search-occurrence” to). The editor view now shows the first occurrence, and your focus is still in the Editor view.

Taking Macros to the Next Level


Now that you've defined a macro, along with a key binding for that macro, it's critical to realize that that key is just like any other. You can now define additional macros that compose that first macro as one of its steps.

As a real-life example, I recently had a set of search results that represented a pattern that I needed to make changes to. Remember again that the key bindings I specify here are my bindings, which may be different from what you have.

While in the editor view looking at the first search occurrence, I pressed the key to start recording a macro (Ctrl+[). I started the macro with the "Home" key because going to a search occurrence puts the cursor at the end of the search string on the line. I then pressed the key I have bound to the Emacs+ "query-replace-regexp" function (Ctrl+;,R). I entered the source string and the replacement string and pressed "." at the next prompt to do the one replacement and exit. I then pressed "End" to go to the end of the line, then I pressed the key I bound to my "goto-next-search-occurrence" macro (Ctrl+;,A), then I ended the macro (Ctrl+]). The key to building a macro that steps through a list is to end the macro with the key that advances to the next entry.

The macro I really defined actually did three different replacements at different points in the file, all of which I did just by pressing keys.

At this point, I simply executed the macro with the "kbd-macro-call" function (Ctrl+\,E) as many times as necessary to step through all of my search occurrences. When I got to the end of my search occurrences, I had numerous modified files, so I did a "Save All" from the menubar.

I could have used the ability in Emacs+ to provide a "prefix argument" to any command, which is used to modify the behavior of the command. When you provide a prefix argument to "kbd-macro-call", it treats it as an integer that represents the number of times to run the macro consecutively. The function is called "universal-argument" (Ctrl+;,Ctrl+U).

Wrap up


This set of practices and tools should be a big help to you and your abused wrist. Be sure to mark Emacs+ as a Favorite in the Eclipse Marketplace.

Thursday, November 6, 2008

Book Review: Clean Code: A Handbook of Agile Software Craftsmanship

I recently noticed (and quickly read) another book from the prolific writer Robert C. Martin, "Uncle Bob" to people who know him in the industry. The book is titled Clean Code: A Handbook of Agile Software Craftsmanship. Although you see "Agile" in the title, it's not really a book about Agile Software Development, although it certainly describes practices that would occur while utilizing Agile techniques. It's really much more about software craftsmanship and refactoring. I'll tell you a little more about the book in this review. Note that all of the examples are Java, but very little content in the book references anything past "core Java", except for perhaps some references to collection classes and concurrency (although the basics of concurrency are not really Java-specific), so a C#-er would still get a lot of benefit from this book.

Note that although I really liked the theme and content of the book, I don't necessarily agree with everything he advises. You shouldn't either, but you should do so for the right reasons. You should never follow rules and guidelines if you don't know why you should do it, or what benefit it provides. If you respect that strategy while reading this book, you will appreciate it for what it is, a very careful and thoughtful analysis of how to write clean code.

What I'm reviewing is the online Safari version of the book, published August 1st, 2008.

Although RCM has the sole author credit, several chapters say right at the beginning "by ...", with names like Tim Ottinger, Michael Feathers, James Grenning, Jeff Langr, Dr. Kevin Dean Wampler, and Brett L. Schuchert, so I imagine this is more of a collaborative work, although it does not detract from the theme or style of the book.

The book has 17 chapters of content. I usually don't consider appendices part of the content of the book, but this book has a very good appendix titled "Concurrency II", which is sort of a "sequel" to the earlier "Concurrency" chapter in the book. I'll talk more about this appendix a little later.

The first chapter of the book is titled "Clean Code", which really sets the theme for the entire book (it's in the title, of course). Whether it's talking about good naming, formatting, coupling/cohesion, or testing, the object is to produce clean code, and to reap the benefits of such behavior. This chapter reviews the basic principles of what "clean code" means without getting into code yet.

The next chapter, "Meaningful Names" (by Tim Ottinger), covers one of the most important intangible skills required for effective software development, being capable enough in the English language (and typing, I suppose) to define names that effectively convey the true meaning and intent of a symbol, without requiring extensive comments to explain the meaning of the name (more about that anti-pattern later). This is a fundamental skill required for writing clean code.

Following this is the chapter called "Functions", which covers issues with function structure and high-level design goals, like "Do one thing" and "One level of abstraction" and issues that the function interface presents to clients of the function that can add or detract to the quality of the product.

The next chapter, titled "Comments", presents a theme that I've felt very strongly about for a long time, in that bad comments are much worse than no comments, and good understandable code with no comments at all is a good thing. The chapter explores various aspects of this.

After this is the chapter titled "Formatting", which emphasizes that formatting is very important, but the actual specification of how code is formatted is less important than the consistency of code formatting within a development group. Fortunately, modern tool and IDE support make it easier to set up and follow agreed-upon formatting guidelines. This chapter also talks a bit about average file length, calling this "vertical formatting".

The next chapter on "Objects and Data Structures" starts with points about proper interface abstraction. It then makes an interesting point about the difference between objects and data structures, in that the latter exposes data, but no functions, and the former exposes functions, but no data. In addition, it points out that between procedural code (using data structures) and object-oriented code, some changes are easier in procedural code, and others are easier in object-oriented code. There is also discussion of the Law of Demeter, which helps to reduce coupling between modules.

The "Exception Handling" chapter after this, by Michael Feathers, gives good advice on defining and using exceptions, and how to handle situations with "null" that can help reduce boilerplate special-case handlers.

The following chapter, "Boundaries" by James Grenning, refers to things beyond the boundaries of our code and application, mostly third-party packages that we integrate our code with. The most important point it makes is to insulate the rest of your code from fragility in that boundary by defining facades and interfaces that allow for changes past the boundaries to not adversely impact the rest of the application.

Next, the "Unit Tests" chapter gets into lots of details about how to write clean tests, but the underlying point (emphasized in the conclusion) is that the code in your tests is just as important as the code being tested, and that clean and understandable tests need to be there as part of the complete package.

After this is the "Classes" chapter, with (as opposed to "by") Jeff Langr, which brings up issues in class organization and structure that help to make the resulting classes easier to understand and more amenable to changes.

Next is the "Systems" chapter, by Dr. Kevin Dean Wampler. This chapter talks about some architecture issues above classes and functions. For instance, it talks about using dependency injection or lazy initialization to separate the setup of a system from its execution. Next, we get into separation of concerns and using proxies and aspect-orientation to implement cross-cutting concerns the right way.

Following this is the "Emergence" chapter, by Jeff Langr. This covers Kent Beck's four rules of "Simple Design", which the author believes contributes to the "emergence" of good design. When you read the information on the first principle, "Runs All the Tests", it really seems like it would be better named "Is Fully Testable". Whatever it's called, the section is clear on the importance of this. The next three principles, named "No Duplication", "Expressive", and "Minimal Classes and Methods" are introduced in the book by summarizing that all of these are achieved through the practice of careful refactoring, which may be an even more important lesson than the principles themselves.

The next chapter, titled "Concurrency", by Brett L. Schuchert, is one of the longest chapters in the book, and deservedly so. Code implementing concurrent algorithms can be extremely difficult to understand and maintain, if principles of clean coding are not observed. Even considering the length of this chapter, this is actually only the first of two chapters on concurrency. The second part is one of the appendices, as opposed to be being part of the regular content. Perhaps the authors felt it was getting too far out of scope, I don't know. The most important advice presented in this chapter is to use the "Single Responsibility Principle", particularly when you're considering writing code that implements both concurrency principles and business logic. This is where the "java.util.concurrent" package provides a lot of advantages, as it encapsulates the details of concurrency, allowing you to plug in POJOs that concern themselves only with business logic. This chapter also mentions an intriguing tool from IBM called "ConTest" that takes an aggressive approach with testing of concurrent code, by introspecting and instrumenting the code to accentuate concurrency vulnerabilities in the code. This is the first I've heard of this tool, but if and when I need to test concurrent code, I will definitely make use of it.

The next chapter, "Successive Refinement" is the first of three chapters where we get to see much of the advice that came before being put to use. These chapters present several "deep dives" into refactoring exercises with specific code samples (mostly taken from real code bases, some written by the author himself). The refactoring steps are very clear and detailed, although it sometimes even becomes hard to follow the detail. This would be a great situation to execute the same steps yourself with the original code base, not just to follow the details, but to help absorb the techniques into your common practices. As is normal in refactoring, some of the later steps were to rework code written in previous steps. Some of the examples mention the Clover code coverage tool, which the author uses to analyze the code coverage of his tests. The second of these three chapters even examines refactoring of JUnit tests, which emphasizes the fact that tests are just as important as the production code.

The last regular content chapter of the book, "Smells and Heuristics", is essentially a dictionary of numerous principles referenced throughout the book. It is divided into sections titled "Comments", "Environment", "Functions", "General", "Java", "Names", and "Tests" (they were ordered alphabetically in the book, also). Each principle in each section is numbered, and the references to these principles throughout the book are abbreviated like "N4", being the fourth principle in the Names section. Although each reference to these principles explained why the principle was used, citing examples where applicable, this dictionary also has its own examples in each principle, further supporting the advice.

As mentioned previously, Appendix A is titled "Concurrency II", by Brett L. Schuchert (again), and it really just explores more issues with concurrency. Curiously, comparing the content of the two chapters, this one explores some of the same concepts, but in more detail, and with more examples than the first chapter. This appendix is perhaps as long or longer than the first chapter on concurrency. This appendix also shows examples using generated bytecode, which helps to illustrate some of the issues a little better.

All in all, a concise (it is only 464 pages, after all) book on refactoring and principles to achieve clean code. It's definitely a book you should read if this is important to you. Just read it with an open mind and you will learn the things you didn't know, strengthen the principles you were already familiar with, and perhaps learn to appreciate more the principles you follow that conflict with the author's advice (few, most likely).